4 Step of PMP Risk Management Basics and Learn them with an Excel template with Heat Map

The purpose of Risk Management is to prevent risk from occurring, and if it occurs, to minimize the damage as much as possible according to PMP’s PMBOK.
(Duration: 6:59)
DOWNLOAD ← Click this to download the “Risk Management Tool” template file.
<< Related Posts >>
- How to Conduct Stakeholder Management (Registration, Analysis, Execution) 【Excel template】
- PMP, PMI and PDU – Differences and Newest Information about PMP’s Renewal Rules
What’s a Heat Map?
Hi, this is Mike Negami, Lean Sigma Black Belt.
Today’s topic is from one of my viewers:

“Please share a heatmap for risk. Thanks a lot, cheers from Perú.”
A heat map visualizes the numerical values by using colors on charts and tables. This heat map is often used in the field of Risk Management in order to find any sign of problems as soon as they appear.
Today I’ll introduce Risk Management in PMP. I also made a template that allows you to immediately practice Risk Management by using the heat map built in the template.
How to conduct PMP’s Risk Management
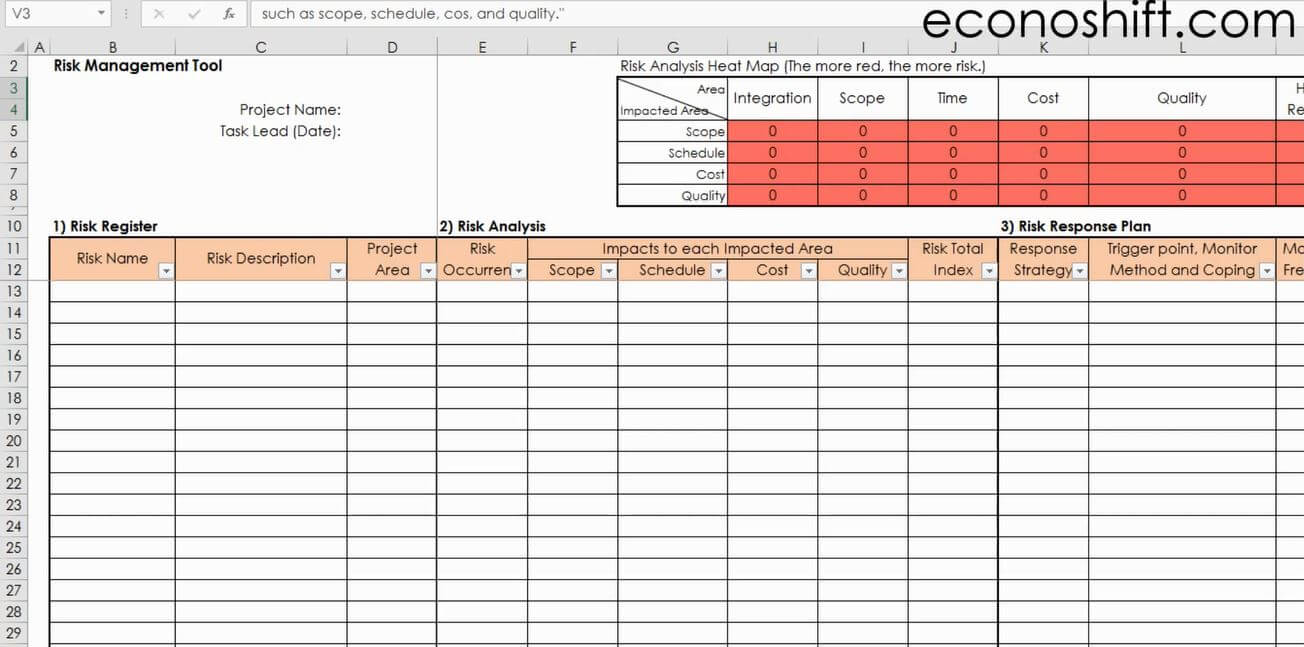
The template looks like the image above. Here are the instructions. What is risk in the first place? In PMP, they define:
“Risk is an uncertain event or condition that, if it occurs, has a positive or negative effect on one or more project objectives such as scope, schedule, cost and quality” From PMI’s PMBOK Guide
Interestingly, PMP targets not only threats as risk, but also opportunities as well, but I won’t include that topic in this video.
The purpose of Risk Management is to prevent risk from occurring and if it occurs, minimize the damage as much as possible. How can we achieve that? Let’s see each step of Risk Management.
1) Risk Registration
The first step is Risk Registration. Before starting this step, make sure to complete the Project Charter and Project Plan. PMP divides a project into 10 Knowledge Areas. Risk Management is one of them.
The other 9 areas are shown in the header of the table above (See the image above.). Integration, Scope, Time, Cost, Quality, Human Resource, Communications, Procurement and Stakeholder. It’s a PMP priority to manage each area well.
Then, by referring to your project documents, consider all possible risks for each knowledge area and each stage of your project, and write the risk names and descriptions in the first two columns. Then, select the Knowledge Areas in the next column that the risk relates to. Up to this point is Risk Registration.
2) Risk Analysis
Next is Risk Analysis. Compare and consider each risk item’s probability of occurrence, then put 1 to 5 in the next column for the lowest to the highest (Qualitative Risk Analysis).
Next, consider the degree of impact when each risk occurs. PMP defines that the impacts will be on scope, schedule, cost and/or quality. Therefore, in the next columns, evaluate how much each risk would impact on those four Impacted Areas with a scale of 1 to 5 (Quantitative Risk Analysis). Of course, leave it blank if it doesn’t impact at all. After evaluating the impacts for all risk items, look at the Total Risk Index in Column J (See the image below). Total Risk Index is calculated to sum all impact degrees, then multiply by the occurrence probability degree. The higher the number, the higher the risk. Sort that column in descending order and gather the higher risk items at the top.

Now the heat map is complete in the above of the table (See the image below). This table has the Knowledge Areas on the horizontal axis and the Impacted Areas on the vertical axis. The numbers on the table were calculated based on your data you input. The more red each area has, the higher the number in the area and the riskier.

3) Risk Response Planning
With this in mind, conduct the next step, Risk Response Planning. Write your risk response plan for each item. First, select a response strategy. There are four strategies in PMP you can choose from. I wrote them here.
Strategy for both Threats / opportunities
- Accept: Will monitor the risk, but do nothing until the risk occurs.
Strategies for Negative Risks or Threats
- Avoid: Eliminate the threat entirely by changing the project management plan.
- Mitigate: Reduce in the probability and/or impact of adverse risk to be within acceptable limits.
- Transfer: Shift the impact of a threat to a third party, together with ownership of the response.
Strategies for Positive Risks or Opportunities
- Exploit: Ensure that the opportunity is realized.
- Enhancement: Increase and maximize the probability and/or the positive impacts of an opportunity.
- Share: Allocate some or all of the ownership of the opportunity to a third party who is best able to capture the opportunity.
From PMI’s PMBOK Guide
In the next column, clarify the trigger point, which is the sign of each risk, name who will monitor it and how, and how to respond if the sign appears and the actual risk occurs (See Column L in the image below). Because of this planning, you may have the ideas that you should do something now. If so, do so. Then, write the frequency of how often you should monitor the risk in the next column. After writing this for all your risks, planning is complete.
4) Risk Control
The next columns are for Risk Control. While conducting main project tasks, monitor each risk according to each one’s frequency. When you’ve finished each monitoring, record the monitored date in the ‘Last Monitored Date’ column (See the Column N in the image above). With this date and the frequency, you can figure out when the next monitoring date should be. When you’ve caught a sign or an actual risk occurs and you’ve taken any action for that, record what you did and that date.
With Risk Control, you rotate the PDCA cycle of Risk Management. Today, we’ve learned Risk Management Basics in PMP along with the template I made. Please practice this in your work.